以下はQTVR Diaryの二宮さんのサイトの記事を続けて読めるように1つに纏めた物です。
Pano2VRオンラインヘルプ和訳にあたってヒトコト
一昨日の拙ブログのアクセス不能事件、大変ご迷惑をおかけして、申し訳ありませんでした。
なんとか翌朝にはサーバ会社での復旧作業が行われ、無事復帰と相成りましたが、どうやらサーバ負荷が大きすぎたようでパンクした模様。なんだか なぁ。もうちょっとマシなサーバプランに変更しないとアカンらしいのですが、何せこのサーバ代を維持するので精一杯の無収入の輩ですから、何か良い方法が あるのか...皆目見当もつきません。「来る来る神戸」の山道さんみたいに、自宅サーバ構築か?!(一応、Web屋の端くれとして、それがどれほど"無茶"なことかをよくよく知ってるだけに、余程の勢いと資金繰りと専門スタッフの雇用が無い限り、手は出せませんって...)
さてさて、本日から8日間かけて、Pano2VRのオンラインヘルプサイトの和訳を行いながら、Pano2VRを実際にどのように使っていけば良いのかを、解説していきたいと思います。

■ Flash and QTVR Panorama Converter - Pano2VR - Garden Gnome Software
http://gardengnomesoftware.com/pano2vr.php
既にソフトそのものの和訳は、青森のhagitanさんがされていますので非常に有り難いのですが、ソフトを見回しても、シンプルな構成なので、その奥の深さまで知り得ることが非常に難しかったりもします。
そこでオンラインヘルプを和訳することで、Pano2VRの真価をご覧いただき、パノラマワークフローをよりスムーズに快適に進めて頂けたらと思う次第です。
実際に和訳するオンラインヘルプは、以下のサイトです。
■ Pano2VR - Help - GardenGnomeSoftware - Garden Gnome Software
http://gardengnomesoftware.com/wiki/Pano2VR_-_Help
このサイトの内容に沿ってお話を進めて参ります。
そして、ページ内に貼ってあるリンクは、この和訳の範囲内であれば、記事が更新されれば、そのままリンクも続々貼られていくような感じになりますので、日を追う毎にリンクが充実していき、本家サイトと同じような構成になっていきます。
また本家サイトにはビデオチュートリアルがありますが、ナレーションが英語で分かりにくいという声も聞いています。
時間があれば、この日本語版ソフトウェアを使ってスクリーンキャストを作っても良いかなぁ、と思っていますが、ちょっと時間が足りないかも...。そっちはあまり期待しないで下さい。
(ボクもやりたいのはヤマヤマなんですよ、ホントに)
また、FlashパノラマVRのカスタマイズ、特にAS3やJavaScriptに関する記述は、ボク自身が非常に自信の無い分野なので、誰か他の人に振りたいぐらいです(泣)しかし時間も全くないので、出来る限り独力で行いたいと思います。
誤訳に関するご指摘は随時受け付けておりますので、コメント欄でどうぞお気軽にご記入ください。
また、チュートリアルに関する質問も、コメント欄で受け付けたいと思います。ボクが分からなくても、誰かが答えてくれると嬉しいなぁ...期待してます!
最後に、今回のこのチュートリアルは、Pano2VRの開発元でもある「Garde Gnome Software」社が公認してくれたイベントになりました。
この和訳をブログでシリーズで行うことをメールしたら、サイトにGoogle翻訳のプログラムバーまで埋め込んでくれていました!Thomas Rauscher氏をはじめとするGGSの所行に感謝!
というワケで、これからパノラマ画像をパノラマVRムービーにしようと色々と計画を立ててらっしゃる皆さん。ぜひPano2VRを念頭に置いてくださいませ。
そしてまずは、ソフトをダウンロードしてみましょう。
■ Pano2VR - Download - Garden Gnome Software
http://gardengnomesoftware.com/pano2vr_download.php
上記ページから最新版のソフトウェア(β版含む)がダウンロードできます。
使用期限はありませんが、ライセンス料を払わないと、出力データには全て"お試し版"の証拠になるスカシが入ります。
また、ライセンス料金は、以下のサイトで支払うことが出来ます。
■ Pano2VR - License - Garden Gnome Software
http://gardengnomesoftware.com/pano2vr_license.php
| ライセンス種別 | シングルユーザー | 企業ライセンス |
| Pano2VVR | €59.00 / US$79.00 | €149.00 / US$199.00 |
| update from Pano2QTVRpro |
€45.00 / US$60.00 | €119.00 / US$159.00 |
| update from Pano2QTVRpro FlashPack |
€29.00 / US$39.00 | €79.00 / US$106.00 |
普通に個人で買えば、今ならPayPalで8000円弱ぐらいでしょうか。
業務で使用するなら、間違いなくこの価値はあります。
個人でやってる人も、週末に大量のパノラマVRコンテンツを作る方なら、持っていて損は無いと思います。
まずはお試し版でチャレンジしてみてください。
一緒に勉強しましょう!
そして、この内容を実際に目の前で実演してみせるのが、10月10日の「QTYVR Diary -OFFLINE- vol.12」です。
ぜひ皆様のお越しをお待ちしております。
今日から8日間みっちり、Pano2VRのオンラインヘルプサイトの和訳(所々、意訳)を行っていきます。
間違っているところなどがありましたら、どんどんコメントでご指摘ください。ご協力、お願い申し上げます。
まず、Pano2VRの概要をお話しておこうと思います。
Pano2VRは、パノラマ画像をパノラマVRコンテンツの変換するソフトウェアです。
出力フォーマットは、QuickTimeVRパノラマと、FlashパノラマVRです。
特にFlashに関しては、ここ2年で急速に発展してきたインタラクティブなパノラマVRコンテンツを気軽に作成できるツールとして、大きく成長してきています。
またFlashPanoramaPlayerやKRPanoと言ったFlashパノラマVR再生ライブラリを使用している方が嘆くXML記述の必要がありませんので、非常に気軽に扱うことが出来ます。
また任意のパノラマ画像のフォーマットを変更するのにも用いることが出来ます。
通常では変形しにくい様々なフォーマットを"気軽に"変換できるのが有り難いです。
こんなソフトウェアが、8000円弱で手に入るのですから、今から勉強しておいて損は無いと思います。
オンラインヘルプのトップページは、ヘルプサイトの目次になっています。
Quick Start Guide
クイックスタートガイド
□ Project Window
プロジェクトウインドウ
□ Importing a Panoramic Image
パノラマ画像の入力
□ Frequently Asked Questions
よくある質問
Using Pano2VR
Pano2VRの使い方
□ Preferences
初期設定
□ Menus
メニュー
□ Viewing Parameters
パラメーターの見方
□ Hotpsot Editor
ホットスポットエディタ
□ Patch Tool
パッチツール
□ Outputting QuickTime VR Movies
QuickTimeVR出力
□ Outputting Flash Movies
FlashVR出力
□ Using the Skin Editor
スキンエディタの使い方
□ Outputting Thumbnails & Remapping Panoramic Images
サムネール画像および再変換したパノラマ画像の出力
□ User Data (Meta Data)
作成者情報(メタデータ)
□ Converting Images
画像変換
Tutorials
チュートリアル
(Go to the video tutorials)
ビデオチュートリアルへ
□ Creating hotspots and building tours
ホットスポットの埋め込み方およびヴァーチャルツアーの構築について
□ Creating 360º Video Panoramas
360°ビデオパノラマの制作方法
Quick Tips
クイックTips
□ Adding multiple states to a button
カスタムボタンの作り方
□ Copying skin elements
スキンの複製
□ Adding multiple hotspots
ホットスポットの追加
Reference
参照
□ Terminology
用語集
□ Licensing Information
ライセンスについて
□ Flash API
FlashAPIについて
□ Flash 9 JavaScript API
Flash9で動くJavaScriptAPIについて
□ Command line
Pano2VRで使用できる特殊コマンドについて
□ Change Log
バージョンアップ情報
□ Video Tutorials
ビデオチュートリアルへ
10月10日(土)15:00〜17:00にアップルストア心斎橋で開催する「QTVR Diary -OFFLINE- vol.12」に向けてお届けする、Pano2VRのオンラインヘルプ和訳。第2回は「クイックスターとガイド:プロジェクトウインドウ」です。
Pano2VR - Project Window
プロジェクトウインドウ
Introducing the Project Window
はじめに
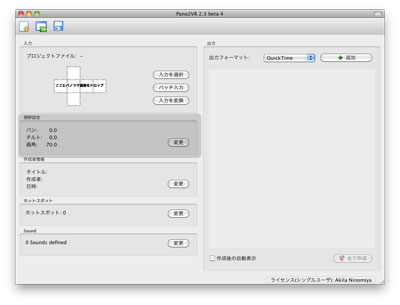
The project window is the first window you'll see when you open
Pano2VR. This is the main workspace; it is where you import your
images, add outputs, define viewing parameters, add user data, and add
hotspots.
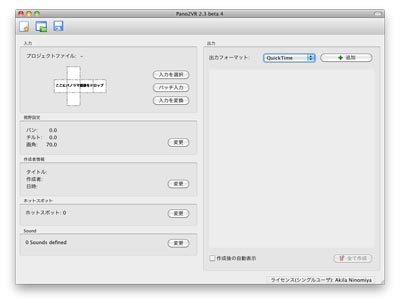
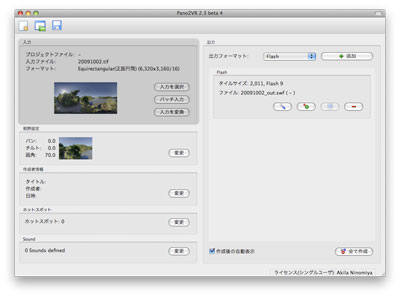
プロジェクトウインドウはPano2VRを開いたときに最初に出てくるウインドウです。パノラマ画像を入力し、出力フォーマットを加え、そのパノラメーターやユーザーデータやホットスポットを決定するなど、主要作業のほとんどを行うメイン画面です。
Input
入力
This section gives you a few options for importing your images. For
a detailed explanation on importing images, please refer to this
article.
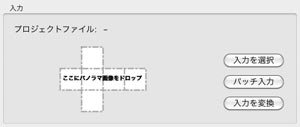
このセクションでは、パノラマ画像を入力するいくつかオプションがあります。画像の入力に関する詳しい説明は「入力」ページを参照してください。
Within the Input section, you can add a patch to your image. To learn how to use the patch tool, see this article.
「入力」セクションでは、パッチ(画像の一部を修正するために抽出する機能)を加えることができます。パッチに使い方については「パッチツール」ページを参照してください。
Choose Convert Input to convert your image to another image type, format, size, etc.
「入力を変換」をクリックすると、入力したパノラマ画像を別のパノラマタイプ、フォーマット、サイズなどに変換することができます。
Viewing Parameters
視野設定
In the viewing parameters section you can define the default view
and define the viewing range of the movie. Choosing Modify will open
the viewing parameters editor. More detailed information on setting the
viewing parameters can be found in this article.
視野設定セクションでは、ムービーを開いたときの最初の表示範囲や角度を決定することができます。「変更」ボタンをクリックすると視野角編集画面が開きます。詳細は「視野角の編集」ページを参照してください。
User Data
作成者情報
Choosing Modify in this section will open a data input sheet where
you can add metadata to your movie. More information can be found here.
「変更」ボタンをクリックするとムービーファイルに埋め込むメタデータの編集画面が開きます。詳細は「作成者情報」ページを参照してください。
Hotspots
ホットスポット
Hotspots or interactive areas within the image, can be added to your
QuickTime or Flash movie. Choose Modify to open the hotspot editor.
Learn more about adding hotspots here.
パノラマ画像に埋め込むホットスポットやインタラクティブ要素は、QTVRまたはFlashVRムービーに追加できます。「変更」ボタンをクリックすると、「ホットスポットの編集」画面が開きます。詳しくは「ホットスポットの追加」ページを参照してください。
Output
出力
The output section is not only a project list that holds all your
modified outputs (or movies to be exported), but it is also where you
choose which format to output.
「出力」セクションでは、全ての変更される出力データ(ムービーであれ画像であれ)を保存するただのプロジェクトリストというだけでなく、選択した場所や出力フォーマットまでもを保存します。
New Output Format: Choose from the following output formats
出力フォーマット:下記の出力フォーマットを選択することができます。
* QuickTime
(QuickTimeVRパノラマムービー)
* Flash
(FlashVRパノラマムービー)
* Transformation
(変換画像)
Add: Click this button open the format's settings window and add the movie to the project list.
「追加」ボタンをクリックすると、フォーマットの設定画面が開き、プロジェクトリストにムービーを追加します。
Open after creation: When this option is enabled, the movies will open (for viewing) after they have been rendered for output.
「作成後の自動表示」にチェックを入れると、出力データのレンダリングが終了後、ムービーが開きます。
Create All: Click this button to output all the movies in the project list.
「全て作成」ボタンをクリックすると、プロジェクトリストにある全てのムービーを出力します。
New, Open, Save - The Icons
「新規プロジェクトを作成」「プロジェクトを開く」「プロジェクトを保存」 - アイコン
The three icons in the top left corner of the window represent the following actions respectively (from left to right):
画面左上にある3つのアイコンは、それぞれ以下の機能を表します。
* Create a new project file
新規プロジェクトを作成
* Open a project file
プロジェクトを開く
* Save project file
プロジェクトを保存
10月10日(土)15:00〜17:00にアップルストア心斎橋で開催する「QTVR Diary -OFFLINE- vol.12」に向けてお届けする、Pano2VRのオンラインヘルプ和訳。第2回は「クイックスターとガイド:プロジェクトウインドウ」です。
Pano2VR - Input
入力
Basics: Importing a panoramic image
パノラマ画像に入力について
There are multiple ways to get your image into Pano2VR:
Pano2VRでは、複数の方法でパノラマ画像を入力することができます。
* Drag and drop your image to be converted onto the the Pano2VR desktop icon (alias).
Pano2VRのデスクトップアイコン(またはそのエイリアス)に、パノラマ画像を直接ドラッグ&ドロップして開くことができます。
* Drag and drop your image onto the Input section of an open project window
プロジェクトウインドウの「入力」セクションに、パノラマ画像をドラッグ&ドロップして開くことができます。
* Choose Select Input and confirm the correct format and browse for the file.
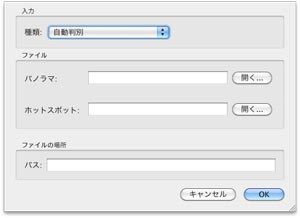
「入力を選択」ボタンをクリックして、各項目を入力して開きます。
Select Input sheet
「入力を選択」画面について
Input
入力
Type: You can either let Pano2VR figure out which
type of image is being imported by choosing Auto, or you can choose for
yourself from the dropdown list:
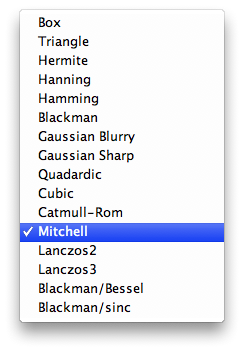
種類:Pano2VRは、ドラッグ&ドロップして入力したパノラマ画像は自動的に種類を判別しますが、プルダウンメニューからマニュアルで選択することもできます。
* Equirectangular
* Cubefaces
* Cylinder
* Strip(Pano2VR独自フォーマット)
* Cross(Pano2VR独自フォーマット)
* Tee(Pano2VR独自フォーマット)
* QuickTime VR
Files
ファイル
Panorama: If your input image is a panoramic image
choose 'Open' next to the text box and choose your image by selecting
it and clicking, Open. You'll then see the file name in the text box.
Click OK.
パノラマ:「開く...」ボタンをクリックして入力したいパノラマ画像を探し出して選択するしてください。パノラマ画像のファイル名がテキストボックスに表示されたら「OK」ボタンをクリックしてください。
Hotspots: If you're opening a Hotspot file, click Open next to the text field. You'll then see the file name in the text box. Click OK.
ホットスポット:「開く...」ボタンをクリックしてホットスポットファイルを選択してください。ファイル名がテキストボックスに表示されたら「OK」ボタンをクリックしてください。
File Location
ファイルの場所
Path: Simply shows you where the file lives on your computer.
パス:選択した画像のコンピューター内の在処を示します。
10月10日(土)15:00〜17:00にアップルストア心斎橋で開催する「QTVR Diary -OFFLINE- vol.12」に向けてお届けする、Pano2VRのオンラインヘルプ和訳。第2回は「クイックスターとガイド:プロジェクトウインドウ」です。
FAQ
よくある質問に答えます
License
ライセンスについて
What is the difference between a "Single User" and a "Company" license?
「シングルユーザー」ライセンスと「企業」ライセンスの違いは何ですか?
A single user license can only be used by a single named user so the
license is issued to "John Doe" and only this user is allowed to use it.
シングルユーザーライセンスとは、"John Doe"さんに発行されたライセンスはこのユーザーしか使用が許可されない、といった一人のユーザーのみが使うことが出来るライセンスです。
A company license can be used by up to 5 users within the same
company. The license can be issued to "Doe Inc." or any other company
name. In addition you can also disable the player branding in the Flash
context menu (=the "About Pano2VR/Object2VR..." if you right click on a
panorama/object movie).
「企業ライセンス」は、同じ会社内で5ユーザーまでが使用できるライセンスです。このライ
センスは"Doe
Inc."のように企業名で発行されます。追加機能として、Flashコンテンツのコンテキスト機能(右クリックで表示される「Pano2VRについて」
を非表示にすることも出来ます)
Can I use a "Single User" License on more then one computer?
シングルユーザーライセンスで、1台以上のコンピューターで利用することは出来ますか?
You can use this license on more then one computer as long as it is always the same named user.
常に同じ名前のユーザー名である限り、1台以上のコンピューターで使用することが出来ます。
Installation
インストール
How can I install an update of Pano2VR/Object2VR/Pano2QTVR?
Pano2VR/Object2VR/Pano2QTVRのアップデートインストールはどのようにすれば良いですか?
Just download the latest version and start the installation program.
Please make sure that program is not running while you run the
installer. You do not have to uninstall any older versions!
最新版をダウンロードして、インストーラーを起動してください。インストールする際には、インストールするプログラムが実行していないことを確認して下さい。古いバージョンをアンインストールする必要はありません。
Can I install Pano2VR, Object2VR and Pano2QTVR on the same machine?
同一マシン内に、Pano2VR/Object2VR/Pano2QTVRをインストールすることはできますか?
Yes! Both programs work completely independent from each other!
はい!全てのプログラムは各々独立して実行されます。
General Questions
一般的な質問
Why can't my operating system open the SWF file?
SWFファイルが開かないのですが?
To display a SWF file you need the Flash standalone player from the
Adobe Flash player site. You can also open the file directly within
your browser; the easiest way is to create an HTML file (you only need
to enable it on the HTML tab) with your panorama.
SWFファイルを表示させるには、AdobeのFlashプレイヤーウェブサイトからスタ
ンドアロンのFlashプレイヤーをダウンロードする必要があります。またはブラウザから直接開く方法もあります。簡単な方法は、パノラマ作成時に一緒に
HTMLファイルも作る(HTMLタブが使用できる時のみですが)ことです。
The Flash player window only shows a white screen. What is wrong?
FlashPプレイヤーの画面が真っ白です。何が間違ってるの?
Your Flash standalone player is too old. Download the latest version from the Adobe Flash player site.
スタンドアロンのFlashプレイヤーのバージョンが古すぎます。最新バージョンをAdobeFlashプレイヤーウェブサイトからダウンロードして下さい。
Flash export: Why is the fullscreen button not working?
Flash出力:フルスクリーンボタンが機能しないのはなぜ?
This is a security issue of Flash. You need to change your Flash
embedding code and set the parameter "allowFullScreen" to "true" in
your HTML file. The HTML export function already produces a proper
file. For more information see this this page.
これはFlashのセキュリティ機能によるものです。Flashコンテンツを埋め込むためのHTMLコードの「allowFullScreen」を「true」に変える必要が有ります。詳しくはこちらのページを参照して下さい。
Why are certain keys not working in the fullscreen mode?
なぜ特定のキーでフルスクリーンモードを動作させられないのですか?
This is a security feature of Flash. In Flash 9 only the ESC key
will work. In Flash Player 10 and later, certain non-printing keys
(specifically the arrow keys, space, and Tab key) are supported. Find
out more in this article.
これはFlash9のセキュリティ機能によるものです。エスケープキーのみ動作させられることが出来ます。Flash10以降では特定の特殊キー(矢印キー、スペース、タブ)がサポートされています。詳しくはこちらを参照してください。
Pano2VR crashes while opening the Viewing Parameters/Point Hotspots window
Pano2VRが視野設定画面/ホットスポット画面を開くとクラッシュします。
The Viewing Parameter/Point Hotspots window is black
視野設定画面/ホットスポット画面が真っ暗です。
The problem is the OpenGL support of your graphics driver. Try to
install a newer/older/different version of your graphics driver. Both,
the viewings parameter and the hotspot window use OpenGL to display the
panorama.
この問題はお使いのグラフィックドライバーがOpenGLをサポートしているか、に起因し
ます。グラフィックドライバーの様々なバージョンをインストールしてみて動作するかどうか確かめてください。視野設定画面とホットスポット画面は両方と
も、パノラマの表示にOpenGLを利用しています。
Pano Creation
パノラマ作成について
How can I create an equirectangular input image?
入力画像としてのEquirectangular画像は、どうやって作るのですか?
There are a lot of programs to create panoramas for example PtGui, AutoPano Pro, and Hugin just to name a few.
PTGui、AutopanoPro、huginなど多くのパノラマ作成ソフトがあります。
How can I create a partial cylindrical panorama? or How can I set the left and right limit of a cylindrical panorama?
360°でない円筒パノラマはどうやって作るのですか?また円筒パノラマの左右の限界値はどうやって決めればよいのですか?
You need to change the input type in the "Select Input" dialog from
"auto" to "cylindrical". Then you can enter the horizontal field of
view that is covered by the panorama. You need to remove any borders on
the left or right side before you import the image into Pano2VR. Check
out the tutorial on creating partial panoramas.
「入力を選択」画面の種類で「自動判別」か「cylinder(円筒投影)」を選択しま
す。次いで「水平画角」を入力して表示させるパノラマの角度を決めてください。Pano2VRに入力する前に、左右の境界を削除して限界値を指定しておく
必要があります。詳しくは「部分パノラマ」ビデオチュートリアルをご覧下さい。
QTVR export
QTVR出力
After clicking the hotspot with target
「target
The plugin initializes all embed tags to it's defaults after
changing the movie. You have to add all embed parameter to the URL
which are different from the default values like:
ムービーが切り替わった後の標準状態では、プラグインは全てのタグが初期化されます。URLが切り替わるたびに初期設定のパラメーターを加えなければなりません。
This works only in the browser, not in the quicktime player.
これはブラウザのみで動作します。QuickTimeプレイヤーでは動作しません。
Pano2QTVR
Pano2QTVRについて
How can I create my own sprites/vrcontroller?
オリジナルのスプライト/VRコントローラーはどうやって作ることが出来ますか?
The only software I know is LiveStage Pro from totally hip. The
sprites that are included with the Pano2QTVR installer are from the
Book QuickTime for the Web. The complete list of all sprites can be
found here.
私が知りうる限り、TotallyHip社から出ている「LiveStage Pro」しか知りません。Pano2QTVRのインストーラーに同梱されてるスプライトは、書籍「QickTime for the Web」からのものです。完全版はこちらをご覧下さい。
0月10日(土)15:00〜17:00にアップルストア心斎橋で開催する「QTVR Diary -OFFLINE- vol.12」に向けてお届けする、Pano2VRのオンラインヘルプ和訳。第5回は「Pano2VRの使い方:環境設定」です。
Preferences/Settings
環境設定/セッティング
Pano2VR's user preferences pane can be found under File >
Settings on Windows and Linux; and under Pano2VR > Preferences on
Mac OS.
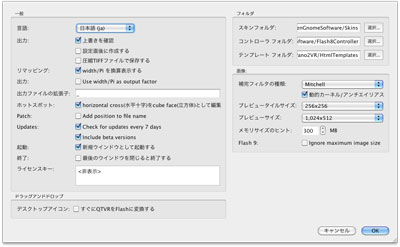
Pano2VRの環境設定画面は、Macならメニューバーの「Pano2VR > 環境設定... (cmd+,)」に、Windowsは「File > Settings」にあります。
General
一般
Language: Choose from the following languages:
言語:以下の言語にローカライズされています
* Chinese 中国語
* English 英語
* French フランス語
* German ドイツ語
* Hungarian ハンガリー語
* Italian イタリア語
* Japanese 日本語
* Korean 韓国語
* Persian ペルシア語
* Russian ロシア語
* Spanish スペイン語
* Swedish スウェーデン語
* Turkish トルコ語
Output
出力
Confirm overwrite: Choose this if you want Pano2VR to confirm that
you will be overwriting a previously saved file. This option is enabled
by default.
上書きを確認する:前に保存した内容に上書きして保存する場合、これを選択してください。デフォルトではオン状態になっています。
Create after setting parameters: Choose this to have Pano2VR create
the output file upon choosing "OK" in the QuickTime, Flash or
Transformation settings sheets. This option is enabled by default.
設定直後に作成する:QuickTimeやFlash、パノラマ画像の出力画面の「OK」ボタンをクリックした直後に、出力データを作成したい場合は、これを選択してください。デフォルトではオン状態になっています。
Save TIFF files compressed: Choose this if you want TIFF files to be compressed on output.
圧縮TIFFファイルで保存する:TIFF画像の出力時に圧縮データで保存する場合に、これを選択してください。
Remapping: Enable this setting to use width/Pi as the conversion factor.
リマッピング:変換時にwidth/Piを換算表示できるようにします。
Output: Enable this setting to use width/Pi as the output factor.
出力:出力時にwidth/Piを換算表示できるようにします。
Output File Suffix: Allows you to choose the suffix
of the file name of your outputted movies. The default is set to _out,
but this can be changed to anything you prefer. For example, you can
use a different term or language.
出力ファイルの拡張子:出力されるムービーデータの名前に拡張子をつけられるようにします。デフォルトでは「_out」ですが、違う言葉や用語を使いたい場合にユーザーが好きなように変えられます。
Hotspots: Enable this to have Pano2VR edit cube faces as a horizontal cross. This option is enabled by default.
ホットスポット:水平十字を立方体として編集することが出来ます。デフォルトではオン状態になっています。
Patch: When this option is enables, Pano2VR will include the position of the patch to the file name.
パッチ:このオプションが選択されているとき、ファイル名にパッチの位置を入れることが出来ます。
Updates: Choose to have Pano2VR automatically check
for updates every 7 days (This option is enabled by default.) and to
include beta versions.
アップデート:これにチェックが入っていると、Pano2VRは7日毎にソフトウェアのアップデート状況を確認(デフォルト時はオン)、確認にベータバージョンを含むことも出来ます。
Startup (Mac only): Opens a new, empty project every time you open Pano2VR. This option is set by default.
起動(Macのみ):Pano2VR起動時に、かならず空の新規プロジェクトが開きます。このオプションはデフォルトではON状態です。
Closing (Mac only): Closing the last open project window will quit the program. This option is enabled by default.
終了(Macのみ):開いている全ての画面を閉じたときに、Pano2VRが終了します。このオプションはデフォルトではON状態です。
License Key: Here you can paste your license if you would like to change it. If you clear the field, you can return to the trial mode.
ライセンスキー:ライセンスキーを変更したい時、ここにドラッグ&ドロップしてください。このスペースを空欄にすると、トライアルモードに戻ります。
Drag and Drop
ドラッグ&ドロップ
If you choose to have a Pano2VR desktop shortcut or alias, you can
simply drag your QTVR movie onto the icon and Pano2VR will immediately
covert the movie to a Flash 9 movie when Covert QTVR to Flash
immediately is enabled. All data including default view, hotspots and
user data are taken from the QTVR file.
これにチェックを入れておくと、QTVRフィルをPano2VRのデスクトップアイコン
(エイリアスやショートカット含む)にドラッグ&ドロップすると、すぐにFlash9フォーマットのFlashパノラマVRムービーに変換されます。
QTVRに含まれているムービー、初期表示設定、ホットスポット、作成者情報など全てのデータが変換されます。
Directories
フォルダ
This section provides directory information. Click Choose to change the directory location.
このセクションでは、フォルダ情報を決定します。「選択...」ボタンをクリックして、フォルダの場所を変更することが出来ます。
Skin Directory: This shows where the Skins are located.
スキンフォルダ:スキンデータの場所を示します。
Controller Directory: This shows where the Controllers are located.
コントローラーフォルダ:コントローラーデータの場所を示します。
Template Directory: This shows where the HTML Templates are located.
テンプレートフォルダ:テンプレートデータの場所を示します。
Images
画像
Interpolation Filter: Select the filter that is used for remapping operations. The different filters can sharpen or blur the image.
補完フィルタの種類:リマップ時に使われるフィルタプログラムを選択します。フィルタを使うことで、シャープをかけたりボカしたりすることが出来ます。
Dynamic Kernet/Anti Aliasing
動的カーネル/アンチエイリアス
Preview Tile Size: OpenGL tile size of the preview
window. This option allows you to change the resolution for the preview
in the viewing parameters window. A higher resolution may slow down the
interaction. The optimal value highly depends on the available memory
on your graphics card.
プレビュータイルサイズ:プレビュー画面のOpenGLのタイルサイズ。このオプションは
市や設定画面のプレビュー解像度を変更することが出来ます。解像度を上げると、動作が重くなることがあります。最適値は、搭載されてるメモリの容量やグラ
フィックカードの種類によって大きく異なります。
Preview Equirectangular Size: same as above, but for equirectangular panoramas.
プレビューサイズ:上記と同じですが、Equirectangularパノラマ画像の際のプレビューサイズです。
Memory Size Hint:
メモリサイズのヒント
Flash9: Ignore maximum amage size
Flash9:最大画像サイズを無視します。
10月10日(土)15:00〜17:00にアップルストア心斎橋で開催する「QTVR Diary -OFFLINE- vol.12」に向けてお届けする、Pano2VRのオンラインヘルプ和訳。第6回は「Pano2VRの使い方:メニュー」です。
Menus
メニュー
All menus are found in the menu bar.
全てメニューバーにあります
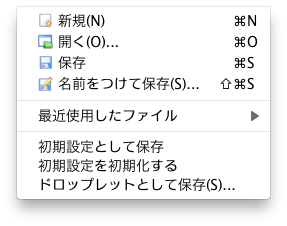
File
ファイル
New: Opens a new project window
新規:新規プロジェクトファイルを開きます。
Open: To open a previous project that has been saved.
開く:既に保存してある既存のプロジェクトファイルを開きます。
Save: Save the project file
保存:プロジェクトファイルを保存します。
Save As: Save the project with a different file name
名前をつけて保存:プロジェクトファイルを別の名前をつけて保存します。
Recent Files: Choose from the most recently opened files
最近使用したファイル:最近開いたことのあるプロジェクトファイルを選択して開きます。
Save as Default: Saves your project preferences as the default preferences
初期設定として保存:今作業しているプロジェクトの設定を、初期設定として保存します。
Reset Default: Resets default preferences
初期設定を初期化する:現在の初期設定値を、出荷状態に戻します。
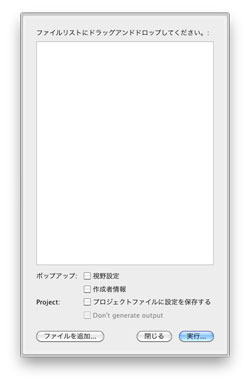
Save as Droplet: Will save your project and
preferences as a droplet onto your desktop for quick image batch
converting (learn how to use and create droplets).
ドロップレットとして保存:画像を素早くバッチ処理させることが出来るドロップレットとして、作業中のプロジェクトや初期設定をデスクトップに保存します。
(詳しくはビデオチュートリアル「ドロップレットの使い方と作り方」を参照してください)
Tools
ツール
Skin Editor: Takes you to the Skin Editor.
スキンエディタ:ヘルプ「スキンエディタ」ページを参照してください。
Show Batch Processing Window: Opens the Batch Processor for easy processing of multiple images.
バッチ処理:複数の画像の作業を容易にするためのバッチ処理画面を開きます。
Edit
編集
This menu is visible when the Skin Editor is open.
このメニューは「スキンエディタ」画面を開いたときに現れます。
* Undo 元に戻す
* Redo やり直す
* Cut カット(切り取り)
* Copy コピー
* Paste ペースト(貼り付け)
* Select All 全て選択
Elements
要素
This menu is visible when the Skin Editor is open.
このメニューは「スキンエディタ」画面を開いたときに現れます。
* Add Container コンテナを追加
* Add Rectangle 矩形を追加
* Add Text Field テキストを追加
* Add Image 画像を追加
* Add Button ボタンを追加
* Add Default Loading Bar ホットスポットテンプレートを追加
初期プログレスバーを追加
* Add Sound 音を追加
Help
ヘルプ
* Online Help: Opens the Help Wiki page.
オンラインヘルプ:Pano2VRウェブサイトのWikiページがブラウザで開きます。
* Video Tutorial:
ビデオチュートリアル:Pano2VRウェブサイトのビデオチュートリアルページがブラウザで開きます。
* About: Information about Pano2VR (On a Mac this is found under Pano2VR > About.)
Pano2VRについて:Pano2VRの情報が表示されます(Macでは「Pano2VR > About Pano2VR」にあります)
10月10日(土)15:00〜17:00にアップルストア心斎橋で開催する「QTVR Diary -OFFLINE- vol.12」に向けてお届けする、Pano2VRのオンラインヘルプ和訳。第7回は「Pano2VRの使い方:視野設定」です。
Viewing Parameters
視野設定
Modifying the viewing parameters will let you set where, within the
image, the movie will begin. You can also set the limits of field of
view and viewing range.
視野設定の変更は、ムービーが始まるときの画像位置を決めます。また、画角や表示範囲の制限も決めることができます。
Watch the tutorial.
チュートリアルビデオをご覧ください。
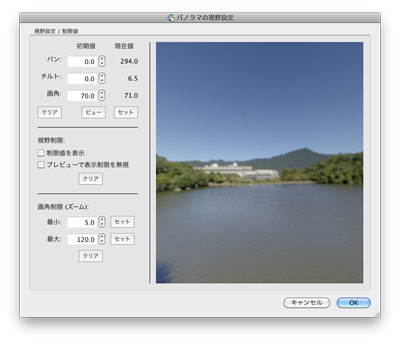
Viewing Parameter/Limits
パノラマの視野設定
Set the default view by moving the image on the right side of the
viewing parameter panel and then click Set. Don't like what you have
chosen? No problem, just click Reset. Lost your spot? Not sure what you
have set the default view to? No problem, just click, Go To.
「パノラマの視野設定」画面の右側の画像を動かし、「セット」ボタンをクリックすること
で、デフォルトの視野を決定します。そんな場所選んでないって?大丈夫。「クリア」ボタンをクリックするだけで元通り。動かしていて元の場所を忘れた?大
丈夫。「ビュー」をクリックするだけで、元のセットした視野に戻ります。
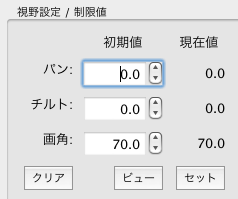
Pan: The horizontal limit
パン:水平方向の制限
Tilt: The vertical limit
チルト:垂直方向の制限
FoV: The depth limit (zoom)
画角:視野の深さ(ズーム)の制限
Viewing Limits
視野制限
These parameters can limit the viewing area of the movie; how far a user can move the movie upwards, downwards, left and right.
これらのパラメーターは、上下左右のムービーの表示範囲を制限することが出来ます。
Show Limits: Check this box to limit how far right, left, up or down
the image can move. Use the input boxes to enter values or move the
movie to the limit and click set at the corresponding side to save the
limit's position.
「制限値を表示」をチェックすると、上下左右の視野の制限値を決めることが出来ます。テキスト入力欄に数値入力するか画面をドラッグして動かし、対応する側の制限値が決まったら「セット」ボタンをクリックします。
Ignore Limits in Preview: The limits that have been set here will
not be applied to the preview movie within this preview window.
「プレビューで表示制限を無視」にチェックを入れると、プレビュー画面で表示制限なしに自由に角度を変えて見ることが出来ます。
Reset Limits: Click this to reset the viewing limit values to their defaults.
「クリア」をクリックすると、設定した視野制限の値をリセットします。
Field of View (Zoom)
画角制限(ズーム)
Set the zooming limits of the movie; how far the user can zoom into
the image or zoom out, hence narrowing or widening the field of view.
ムービーの画角(ズームアウト:広く/ズームイン:狭く)制限を決めます。
HINT: use the scroll wheel on the mouse to zoom.
(ヒント:ズームの変更にはマウスのスクロールホイールを使うことが出来ます)
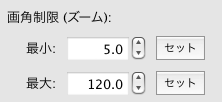
Minimum: Zoom in as far as preferred and click set to apply the setting.
最小:好きな位置にズームインして、「セット」ボタンをクリックして位置を決定してください。
Maximum: Zoom out as far as preferred and click set to apply the setting.
最大:好きな位置にズームアウトして、「セット」ボタンをクリックして位置を決定してください。
Reset Limits: Click this to reset the viewing limits values to their defaults.
クリア:クリックするとデフォルトの画角にリセットされます。
10月10日(土)15:00〜17:00にアップルストア心斎橋で開催する「QTVR Diary -OFFLINE- vol.12」に向けてお届けする、Pano2VRのオンラインヘルプ和訳。第8回は「Pano2VRの使い方:パッチツール」です。
Using the Patch Tool
パッチツールの使い方
The patch tool was added to Pano2VR in version 2.1 (beta). It allows
you to non-destructively extract and modify only a specified area of
the image without having to remap and convert the whole image.
パッチツールはPano2VR2.1から加わった機能です。画像全体を変換することなく、画像の特定の範囲だけを指定して画像を修正することができ、全体に反映させることができます。
Watch the tutorial.
チュートリアルビデオをご覧ください。
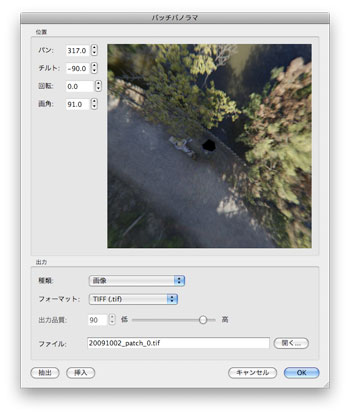
Position
位置
Use this section to position the area to be extracted. Note that you can choose from Pan, Tilt, Roll and FOV (field of view).
このセクションでは、抽出する範囲を決めます。選択肢は「パン・チルト・回転・画角(FOV)」です。
Output
出力
Use this section to determine the type and destination of the extracted file.
このセクションでは、抽出するファイルの種類や保存場所を決めます。
Type: Choose the type of image to be extracted. Image, Mirrorball, Angular Map, Sphere.
種類:抽出する画像の種類を選択します。画像・鏡面体・二点遠近・球体
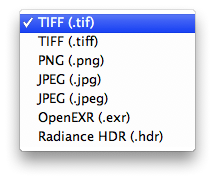
Format: PNG, TIFF and JPEG are the available formats to choose from. This is only available when your Type is set to Image.
フォーマット:PNG、TIFF、そしてJPEGが選択肢として利用できます。
Image Quality: The JPEG quality of the image.
出力品質:JPEG画像の品質
File: Name the patch here or open a new version of a patch.
ファイル:ココで使うパッチの名前、または新しいバージョンのパッチを開きます。
How To
使い方
For a detailed explanation how to use this patch tool, check out the tutorial.
パッチツールの詳しい説明は、ビデオチュートリアルをチェックしてください。
Quickly Create a Mirrorball Patch
ミラーボールパッチの簡単な作り方
1. Import your image to Pano2VR and in the Input section, choose Patch Input.
1.「入力」セクションでパノラマ画像を入力して、「パッチ入力」をクリック。
2. In the window that pops up, click Add to make a new patch.
2.新しい画面がポップアップで開くので、新規パッチの「追加」ボタンをクリック。
3. In the Position section of the Patch editor, use your mouse to frame
the section of the image to be patched or manually input the values for
pan, tilt, roll and FOV.
3.「パッチパノラマ」画面の「位置」セクションで、マウスを使って位置を手動で調整するか、パン/チルト/回転/画角にそれぞれ数値入力して、抽出するパッチ画像の位置を決めてください。
4. In the Output section, choose Mirrorball as the Type.
4.「出力」セクションの「種類」を「MirrorBall(鏡面体)」を選択してください。
5. Click OK or Extract to output the image.
5.「OK」または「抽出」をクリックして、画像を出力します。
6. Pano2VR will ask you if you want to extract the patch image. Choose, Yes.
6.パッチ画像を反映したいかどうか尋ねてきますので、「はい」を選択してください。
7. In the Patch Panorama window, you'll see your patch details with the
ability to change the parameters. Click OK to create the patch. (This
will apply the patch to the image.)
7.「パッチパノラマ」画面では、数値の変化によるパッチの詳細をみることができます。「OK」をクリックして、パッチを作りましょう。(これで画像にパッチを当てることができます)
8. Pano2VR will ask you if you want to update the image patches. Choose, Yes.
8.パッチ画像をアップデートするかどうか尋ねてきますので、「はい」を選択してください。
9. Done! Now you can output your panorama with the patch.
9.出来ました!これでパノラマ画像にパッチを当てることが出来ましたね。
Extract, Edit and Patch
抽出、編集、そしてパッチ
1. Import your image to Pano2VR and in the Input section, choose Patch Input.
1.「入力」セクションでパノラマ画像を入力して、「パッチ入力」をクリック。
2. In the window that pops up (Patch Panorama window), click Add to make a new patch.
2.新しい画面がポップアップで開くので、新規パッチの「追加」ボタンをクリック。
3. In the Position section of the Patch editor, use your mouse to frame
the section of the image to be patched or manually input the values for
pan, tilt, roll and FOV.
3.「パッチパノラマ」画面の「位置」セクションで、マウスを使って位置を手動で調整するか、パン/チルト/回転/画角にそれぞれ数値入力して、抽出するパッチ画像の位置を決めてください。
4. In the Output section, choose Image from Type.
4.「出力」セクションの「種類」を「画像」を選択してください。
5. Choose your desired image output format.
5.希望する出力フォーマットをを決めます。
6. Click OK or Extract.
6.「OK」または「抽出」をクリックして、画像を出力します。
7. Pano2VR will ask you if you want to extract the patch image. Choose, Yes.
7.パッチ画像を反映したいかどうか尋ねてきますので、「はい」を選択してください。
8. Open your extracted image in an image editing software and make the
necessary changes. You can leave the areas you don't want to change
transparent.
8.抽出した画像を編集ソフトで開き、必要な修正を施してください。変更したくない場所は透明にしておくことで、反映させないでおくことができます。
9. In Pano2VR, in the Patch Editor, click open to add the modified patch and then click OK.
9.パッチエディタで修正した画像を開き、「OK」をクリック。
10. Click OK again in the Patch Panorama window to update the patch. Done!
10.もう一度「OK」をクリックして、パノラマウインドウにパッチが更新されます。おしまい!
10月10日(土)15:00〜17:00にアップルストア心斎橋で開催する「QTVR Diary -OFFLINE- vol.12」に向けてお届けする、Pano2VRのオンラインヘルプ和訳。第9回は「Pano2VRの使い方:作成者情報」です。
User Data
作成者情報
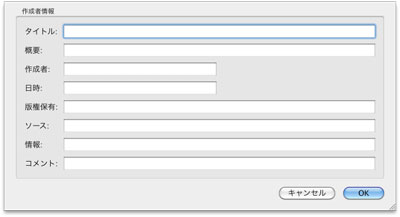
If you want metadata available in your movie, you can add it here. The fields are rather self-explanatory:
ムービーにメタデータを追加するには、この画面で行ってください。各フィールドの説明は以下の通りです。
* Title
タイトル
* Description
概要
* Author
作成者
* Date and Time
日時
* Copyright
版権保有
* Source
ソース
* Information
情報
* Comment
コメント
Need to see how it works? Check out the tutorial.
どのように使うかは、チュートリアルビデオを参照してください。
A list of HTML tags that can be used can be found here.
HTML内に挿入するタグは、こちらのウェブサイトを参照してください。
10月10日(土)15:00〜17:00にアップルストア心斎橋で開催する「QTVR Diary -OFFLINE- vol.12」に向けてお届けする、Pano2VRのオンラインヘルプ和訳。第10回は「Pano2VRの使い方:入力画像の変換」です。
Pano2VR - Convert Input
入力画像の変換
After you import your image to Pano2VR, you can choose to convert
that image to a different projection. To convert your image, click on
the Convert Image button in the Input section of the main project
screen.
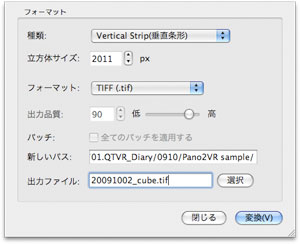
Pano2VRでパノラマ画像を入力した後で、違う投影法の画像に変換することが出来ます。画像を変換するには、プロジェクト画面の「入力」セクションにある「入力を変換」ボタンをクリックします。
Parameters
パラメーター
When you click the Convert Image button you will see a Format sheet.
「入力を変換」ボタンをクリックすると、「フォーマット」画面が表示されます。
Type: Choose from a variety of different projection formats to convert your inputed image.
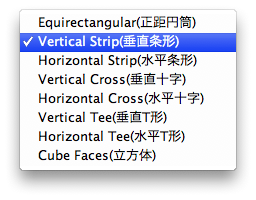
種類:入力画像に対して変換を施すさまざまな投影方法を選択できます。
Cube Face Size: Set the size of the cube face in pixels.
立方体サイズ:立方体の1面のサイズをピクセル単位で設定します。
Format: Choose the format/extension of the image from the menu.
フォーマット:画像フォーマットと拡張子をメニューから選びます。
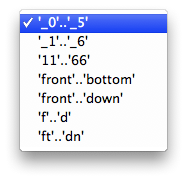
When converting to Cube Faces, a new menu will appear giving you the option to choose the naming convention of the faces.
立方体で変換する場合、変換時に付ける接尾詞を選択するオプションメニューが現れます。
Image Quality: Choose the JPEG quality of the image. This option is only available for the JPEG formats.
出力品質:JPEG画像の画質を設定します。このオプションはJPEGにのみ利用できます。
Patches: If you have created patches for the
inputted image, you can choose to the apply those same patches to
converted image. This option is only available when patches have been
applied.
パッチ:入力画像にパッチを充てている場合、出力画像に対してすべてのパッチを反映させることができます。このオプションはパッチを充てている時にのみ利用できます。
New Path: This field shows where the image is located.
新しいパス:保存する場所を表示します。
Output File: Here you can change the name of the
outputted file and it's location. The name of the original image will
be applied to the converted image. If a new output location is not
chosen, the converted image will be saved to the same directory as the
original image.
出力ファイル:ここでは保存するファイルの名称と保存する場所を変更することが出来ます。元のファイル名は、変換後の画像として適用されます。もし新しい保存場所を選んでいなければ、変換後の画像は元の画像と同じフォルダの中に保存されます。
10月10日(土)15:00〜17:00にアップルストア心斎橋で開催する「QTVR Diary -OFFLINE- vol.12」に向けてお届けする、Pano2VRのオンラインヘルプ和訳。
すでに10回更新していますが、皆さん着いてきていますか?(笑)
内容がどんどん濃くなっていきますよ。気合い入れて、読み進んできてくださいね。ひと通り読み終えれば、最後にはリンクを貼り直して、日本語チュートリアルヘルプサイトになるんじゃないかなと思います。ご期待ください!
あと...懇親会の参加表明、今のところ、誰も申告してないんですが、今回、無しですか?イイんですか?
巷ではいろんなオフ会が開催されてますが(ボクも何10回と参加してますが)、面白さにかけてはハンパ無いと思います。自信あります。満足させられます。
来ないと、損すると思いますよ!今からでも間に合います。じゃんじゃんご参加くださいねー!
さて今回からいよいよ出力について、お話していきます。第11回は「Pano2VRの使い方:QuickTimeVRの出力」です。
Pano2VR - Output - QTVR
Pano2VR - 出力 - QTVR
Outputting QuickTime VR Movies
QuickTimeVRムービーの出力
With Pano2VR you can convert your panoramic image into a QuickTime VR movie. To see how it is done, check out the tutorial.
Pano2VRでは、パノラマ画像をQuickTimeVRムービーに変換することが出来ます。どのようにするかは、チュートリアルビデオをご覧下さい。
Settings Tab
設定タブ
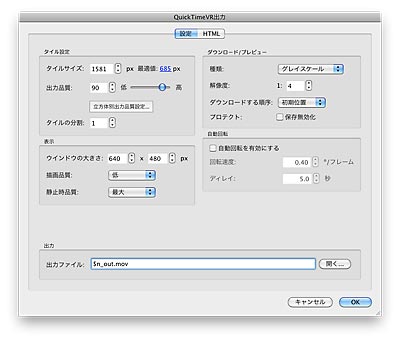
Tile Settings
タイル設定
Cube Face Size: The size of the cube face, measured
in pixels. Pano2VR will calculate the best output cube face size based
on the original image. However, you can always change this value to
what you like.
タイルサイズ:立方面のサイズをピクセルで指定します。Pano2VRは、オリジナルの画像データから最適な大きさのタイルサイズを自動的に算出します。
If, for example, you have an image that is 6000 pixels wide, each
cube face will have a value of 1500 pixels (6000/4). To help output a
smaller file size, however, you can lower the cube face size. For
instance, a 6000 pixel wide image could be reduced to a 750 cube face
size (6000/8).
例えば、横幅6,000pxの画像の場合、各立方面の大きさは6,000÷4=1,500pxになります。しかし、ファイルサイズをもっと小さくするためには、タイルサイズももっと小さくすべきです。例えば、6,000÷8=750pxになるように、など。
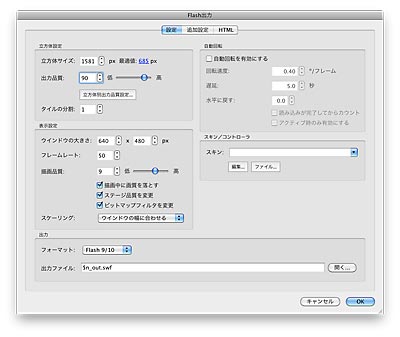
Image Quality: The overall quality of the image. 90
is the default value, lowering to a value below 90 will lower the
quality of the outputted image.
出力品質:画像全体の品質。90がデフォルト値ですが、出力データのファイルサイズを小さくしたければ、90以下にすればよいです。
Sub Tiles: Sub Tiles allows you to choose how many tiles per cube face.
タイルの分割:タイルを分割してサブタイルにすることができます。
Display
表示
Window Size: Adjust the size of the display window of the QuickTime movie.
ウインドウの大きさ:QuickTimeムービーの画面の大きさを調整します。
Motion Quality: Motion quality refers to the
quality of the movie during movement. Its setting is always a trade-off
between image quality and motion speed. The lower the quality the
larger the possibility of visible aliasing but faster movement. There
are six steps of quality with the lowest quality setting being, Min ,
while the highest quality setting is Lossless:
描画品質:描画品質はムービーが動いている時の品質です。この設定は常に画質と速度で反比例します。低品質で画質補完が激しいものは速く動きます。この設定は、最も低い値「最小」から最も高い値「ロスレス」まで6段階に分かれています。
* Min 最小
* Low 低
* Normal 中
* High 高
* Max 最大
* Lossless ロスレス
Static Quality: The quality of the movie when it is not in motion.
静止時品質:ムービーが動いていない時の描画品質。
* Min 最小
* Low 低
* Normal 中
* High 高
* Max 最大
* Lossless ロスレス
Download/Preview
ダウンロード/プレビュー
The Download/Preview parameters box lets you choose the type of image that is seen when the movie is downloading.
「ダウンロード/プレビュー」は、ムービーがダウンロードしている最中の見え方を設定します。
Type: Choose how you want your movie to look like as it is downloading.
種類:ダウンロードしている最中の見た目を選択して下さい。
* None: no change
なし:何も変えない。
* Grayscale: the movie will appear black and white during downloading
グレイスケール:ダウンロード時に白黒で表示させます。
* Sepia: the movie will be tinted with sepia
セピア:セピア調に変えます。
* Color: will keep the original color of a color image
カラー:オリジナルカラーのまま。
Resolution: How clear or unclear the movie will appear during downloading.
解像度:ダウンロード時にどのくらい鮮明に見えるかを、指定します。
When the resolution is set to a ratio of 1:1, there will be no
change in the image - it will be as clear as the original movie. A
setting of 1:4, the default, will lower the resolution enough to make
it obvious that this is only a preview of the movie due to the
blurriness.
解像度比を1:1にすると画像品質は変わらず、オリジナルムービーと同様に鮮明なプレビューになります。デフォルト値は1:4ですが、これより数値を大きくすると、プレビューがよりボケた感じになります。
Download Order: You can choose in which order the movie will begin to download and therefore be visible during the preview.
ダウンロードする順序:プレビュー時にダウンロードする見える面の順序を指定します。
* Default View: Will download the part of movie that is set in the viewing parameters.
初期位置:視野設定でセットしたムービーの位置からダウンロードを始めます。
* Random: Random sections will be viewable during download
ランダム:ダウンロードされる位置はランダムに表示されます。
Protection: Check this box to disable the ability for the user to save the movie to disk.
プロテクト:ここにチェックをすると、ムービーをローカルディスクに保存できなくなります(保存無効化)。
Auto Rotate
自動回転
Enable auto-rotation: When this option is checked, the movie will begin to auto rotate once fully downloaded.
自動回転を有効にする:このオプションにチェックを入れると、ダウンロードが全て行われた後に、自動回転が始まります。
Pan Speed: Pan refers to the left and right
movement of a camera motion. Here is it used to express how fast a
movie will rotate, and in which direction it will rotate. A negative
value will cause the movie to rotate from right to left, while a
positive value will cause the movie to rotate from left to right.
回転速度:カメラの左右の動きを示します。ここでは、どのくらい速くムービーを回転させるか、どちらの方向に回転させるかを説明しています。マイナスの値を入れると右から左へ、プラスの値を入れると左から右へ回転します。
The values are expressed as degrees per frame. A value of 0.40 (the
default) refers to a speed of four tenths of a degree per frame.
値はフレームあたりの角度で表されます。「0.40」という値(デフォルト値)は、1フレームあたり4/10°の速度を示します。
Delay: Delay is how long the movie will stay static
before rotating again after it has been manually moved with the mouse
or keyboard.
ディレイ:ディレイ(遅延)は、キーボードやマウスなどで手動で動かした後に再び自動回転するまでの時間です。
The values here are expressed in seconds. The default value is a delay of 5 seconds.
値は秒で表されます。デフォルトでは5秒です。
Output
出力
Output file: _out.mov is the default name for the output file. To change the default, choose Pano2VR > Preferences.
出力ファイル:「_out.mov」は出力ファイルのデフォルト値です。デフォルト値を変更するには、環境設定で指定して下さい。
By default, the QuickTime movie will be saved to the same directory as the image. This can be changed by choosing, Open.
デフォルトでは、QuickTimeムービーはパノラマ画像と同じフォルダに保存されます。「開く...」ボタンをクリックして、別のフォルダを選択することも可能です。
$n is a placeholder and will be replaced with the name of the image.
「$n」は代替語で、画像名に置き換わります。
The HTML Tab
HTMLタブ
Use this tab to make a customizable HTML page to add to your website that includes not only your panoramic movie but also audio.
ウェブサイトに追加するためにカスタマイズ化されたHTMLページを作るためには、このタブを開いて利用します。またこのページにはパノラマムービーだけでなく音を埋め込むこともできます。
Watch a tutorial on creating an HTML page.
HTMLページの生成方法はチュートリアルビデオをご覧下さい。
Information on the coding language used to create the HTML template can be found here.
HTMLテンプレートを構築するために使うコーディング言語の情報は、「HTML Template」ページを参照して下さい。
To be able to edit the HTML template parameters, you must select Enable Html File.
HTMLテンプレートが編集できるためには、有効なHTMLファイルを選択する必要が有ります。
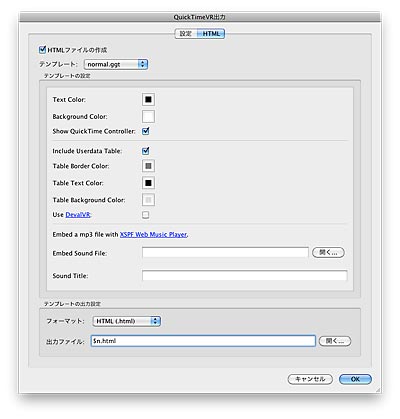
Template: Here you can choose a pre-loaded template
(fullscreen.ggt or normal.ggt). The normal template will give you the
ability to add table that shows the user data; whereas the fullscreen
template will not.
テンプレート:ココでは(fullscreen.ggtかnormal.ggtのどちらか)のテンプレートを事前に選択することができます。「normal」テンプレートでは作成者情報の表が追加されたページを利用でき、一方はフルスクリーンページが利用できます。
Template Parameters
テンプレートパラメーター
Text, Background Colors: Choose the color of your text and your page background.
文字色、背景色:文字の色とページ背景の色を決定します。
Show QuickTime Controller: Select/Deselect this checkbox to show or hide QuickTime's VR controller.
QickTimeコントローラーの表示:チェックボックスの選択の有無で、QickTimeVRコントローラーの表示/非表示を決めます。
Include Userdata Table (normal only): Select/Deselect this checkbox to show/hide a table that includes information added to the userdata section.
作成者情報表を含む(normalのみ):このチェックボックスの有無で、作成者情報セクションで加えられた情報の表の表示/非表示を決めます。
Table Border, Table Text, Table Background Colors: Use these color pickers to customize how your table.
表罫、表文字、表背景色:表の要素の色をカラーピッカーを利用して決めます。
Use DevalVR: Select/Deselect this checkbox to use the DevalVR browser plugin for viewing the panorama.
DevalVRを使う:このチェックボックスの有無で、パノラマ再生にDevalVRブラウザプラグインの利用の有無を決めます。
Embed Sound File: Choose Open to locate and choose your MP3 of choice.
サウンドファイルの埋め込み:埋め込むMP3ファイルを選択して下さい。
Sound is embedded using the XSPF flash-based web application. Information about it can be found here.
音声データは「XPSF」というFlashベースのウェブアプリケーションを用いて埋め込まれます。詳しい情報はこちらを参照のこと。
Sound Title: The title of your audio (MP3) goes here.
サウンドタイトル:音声データ(MP3)のタイトルはここに書き込みます。
Template Output
テンプレートの出力設定
Format: Choose between the extensions, .html and .htm.
フォーマット:拡張子を「.html」と「.htm」の2つから選択して下さい。
Output File: This field shows the output file name.
The HTML file, as the default, will be saved to the same directory as
your original image. You may change this by choosing Open.
出力ファイル:出力ファイル名を表示します。デフォルトでは、オリジナルの画像と同じフォルダに保存されます。保存先を変更するには「開く...」をクリックして選択して下さい。
10月10日(土)15:00〜17:00にアップルストア心斎橋で開催する「QTVR Diary -OFFLINE- vol.12」に向けてお届けする、Pano2VRのオンラインヘルプ和訳。第12回は「Pano2VRの使い方:Flashムービーの出力」です。
いよいよココからが本番ですね。昨今の時流に乗って、FlashパノラマVRコンテンツをカンタンに生成できる方法を会得しましょう!
Pano2VR - Output - Flash
Pano2VR - 出力 - Flash
Outputting Flash Movies
Flashムービーの出力
Pano2VR gives you the added ability to convert panoramic images into Flash movies. Click here to see an example.
Pano2VRは、パノラマ画像をFlashムービーに変換することができます。サンプルをこちらからご覧ください。
Click here to watch a tutorial on the basic settings for outputting a Flash movie.
Flashムービー出力の基本的な設定は、こちらのチュートリアルビデオをご覧下さい。
And to watch a more advanced tutorial for outputting a Flash movie, Click here.
そして、Flashムービー出力の応用チュートリアルは、こちらのビデオでどうぞ!
Settings Tab
設定タブ
Tile Settings
タイル設定
Cube Face Size: The size of the cube face, measured
in pixels and gives the resolution of the panorama. Smaller cube faces
produce smaller file sizes.
タイルサイズ:立方面のサイズです。パノラマ画像の解像度からタイルサイズをピクセルで指定します。タイルサイズが小さいと、ファイルサイズもより小さくなります。
Optimal: Pano2VR will calculate the best output cube face size based on the default view (FoV) and the window size.
最適値:Pano2VRは、視野角(FoV)とウインドウの大きさを基準とした最適なタイルサイズを自動的に算出します。
Image Quality: The overall quality of the image as
defined in JPEG images. 90 is the default value, lowering to a value
below 90 will lower the quality of the outputted image and reduce the
file size.
出力品質:JPEGで定義される画像品質です。デフォルトは90です。90より小さいと画質は落ちますが、出力されるファイルサイズも小さくなります。
Tile Quality: Set the quality for each individual tile, including the preview image.
立方体別出力品質設定:プレビュー画像を含む、立方体の各面毎に設定する画像品質を設定します。
Sub Tiles: Enter the number sub tiles for each cube face.
サブタイル:各立方面で分割されるサブタイルの分割数。
Display
表示設定
Window Size: Adjust the height and width of the movie window.
ウインドウの大きさ:ムービー画面の大きさを調整します。
Frame Rate: Adjust the frame rate of the movie. A
smaller frame rate can reduce the processing needed on the clients
machine. This can be helpful if you have several panoramas on one page.
フレームレート:ムービーのフレームレートを調整します。小さいフレームレートはクライアントマシンでのプロセスを減らします。1つのページに複数のパノラマが存在する時に役に立ちます。
Render Quality: Adjusting the image quality slider determines the amount of distortion (or waves):
描画品質:歪み(または波々)の量をスライダーバーで調整します。
Lesser quality (low) = more distortion but a faster speed;
低(低品質)=歪みは大きいですが、スピードは速いです。
Higher quality (high) = less distortion but a slower speed
高(高品質)=歪みは少ないですが、スピードは遅いです。
TIP: If your panorama window is small, start with a quality of 7 and disable decrease quality while moving.
ヒント:ウインドウの大きさが小さいとき、品質を「7」にし、「描画中に品質を落とす」をオフにすると良いです。
NOTE: This quality setting does not affect the overall file size.
注意:この描画品質の設定は、ファイルサイズ全体には影響しません。
Decrease quality while moving: To increase the
response to movements the quality is reduced while moving the panorama.
This optimization can produce a popping effect on some content so if
you don't like this effect or you are already using a low quality
setting you should disable this option.
描画中に品質を落とす:動作品質の応答を向上させるために、パノラマが動いている時の品質
を落とします。この最適化では、コンテンツの中には飛び出すような効果が生じるものもあるので、もしこの効果が好みでなかったり、既に低い品質で設定して
る時には、このオプションは利用すべきではありません。
Change stage quality: Keep this option checked if
the panoramic image does not include elements on the flash stage (i.e.
vector based controller, your own loading bar, etc.). When this option
is not checked it helps to eliminate the jagged lines that appear with
elements in the image during movement.
ステージ品質を変更:もしパノラマ画像が、ベクターデータで作ったコントローラーや、独自
作成のローディングバーなどのようなFlashコンテンツを含んでいないのなら、のこのオプションをチェックしておいて下さい。このオプションがチェック
されていない時は、ムービーの動作中に表示されるギザギザの線を除去するのに役立ちます。
Change bitmap filtering: Same as above but has an effect only on the panorama not the whole stage.
ビットマップフィルタを変更:上記と同じですが、ステージ全体のパノラマにのみ作用します。
Scaling: Scaling resizes the window in which the
movie will play. Here you can choose how the panorama will be resized
when its window's proportions change.
スケーリング:スケーリング(拡大縮小)で再生しているムービーのウインドウをリサイズします。ここではパノラマムービーがどのようにリサイズするかを、ウインドウの縦横比の変化によって決定します。
* None: No scaling will occur when the size of the window is
changed and the background will be visible when it is larger than the
movie.
なし:ウインドウのサイズを変えようとも拡大縮小しませんし、ムービーよりウインドウが大きくなれば背景が見えるようになります。
* With window: The panorama will maintain its aspect ratio regardless of the window size.
ウインドウの幅に合わせる:ウインドウサイズにかかわらず、パノラマの縦横比は保たれます。
* No border: The movie will maintain its original resolution but it
is scaled up so that no border or background is visible. This setting
can improve speed while lowering the resolution.
枠なし:ムービーがオリジナルの解像度を保持できなくなると、背景や枠が表示されるまでスケールアップされます。この設定は解像度が低くなっていくときに速度の向上が計れます。
* Exact fit: the movie will scale to the window's proportions
causing the panorama to distort and the aspect ratio is not locked to
the original values.
画面に合わせる:ムービーはウインドウの縦横比に変形されます。オリジナルの縦横比に固定されず、パノラマを大きく変形させます。
Auto Rotate
自動回転
Enable auto rotation: When enabled, the panorama will begin to move (rotate) when the window is opened or when triggered by the mouse.
自動回転を有効にする:これを利用可能にしていると、ウインドウが開いた後やマウスによる動作があった後で、回転移動が始まります。
Pan Speed: Pan speed refers to how fast the movie will rotate from left to right (positive number) or right to left (negative number).
回転速度:回転速度は、どのくらいの速度で、左から右へ(正の数値)または右から左へ(負の数値)回転移動するかを記述します。
Delay: The time it takes for the panorama to begin to rotate (in seconds) again after it has been manually moved by the user.
遅延:これは、パノラマがユーザーによって手動で動作があった後で再び回転が始まるまでの時間です。
Return to Horizon: Brings the movie's center
perspective (horizon) back into view after it has been manually moved
upwards or downwards. A value of 0 will equate to no return, and an
increase in the value will return the image to the horizon at a quicker
speed.
水平に戻す:ユーザーが上下方向に手動で移動させた後で、ムービーを水平位置に戻すまでの時間を指定します。値が「0」の時は水平に戻りません。値が大きくなる毎に、水平位置に戻る速度がより速くなります。
Start after fully loaded: Enable this option if you
want the movie to start rotating only after it has been fully loaded.
If left disabled, the movie will rotated while it is being downloaded.
読み込みが完了してからカウント:ムービーの読み込みが全て終わってから回転を始めたいときは、このオプションにチェックを入れて下さい。もし入れなければ、ダウンロード中から回転することになります。
Only in Focus: When enabled, the panorama will only rotate when the mouse hovers over it.
アクティブ時のみ有効にする:ここにチェックを入れておくと、パノラマ上にマウスカーソルがある時だけに回転されます。
Skin/Controller
スキン/コントローラー
Skin: Here you can choose either one of the
pre-installed skins or choose one that you have created. The file
extension used for the skins is .ggsk (stands for Garden Gnome Skin).
スキン:ここでは既にインストールされているスキンか、独自で作ったスキンのいずれかを選択することが出来ます。ファイルの拡張子は「.ggsk("Garden Gnome Skin"の略)」が使われます。
Edit: Clicking this will bring you to the Skin Editor.
編集...:クリックすると、スキンエディタが開きます。
File: Click here to choose a skin. It will direct you to the Garden Gnome Skins folder.
ファイル...:スキンを選択するにはここをクリックして下さい。GardenGnomeSkinフォルダを直接開きます。
External Controller: When outputting to Flash 8,
this option will be enabled. Here you can choose a controller for Flash
8. Further adjustments to the skin can be made in the Loading (Flash 8)
tab that appears when Flash 8 is chosen as the output format in the
Ouput section.
外部コントローラー:Flash8で出力する時に、このオプションが利用できます。ここで
はFlash8のためにコントローラーを選択することができます。出力セクションでフォーマットにFlash8を選択した時に現れる「取込
(Flash8)」タブの中で、さらにスキンの調整を行うことができます。
Alpha: Choose the percentage of transparancy of the controller.
透明度:コントローラーの透明度をパーセントで選択します。
Anchor: Pick an area to secure the controller.
アンカーポイント:コントローラーのセットする位置を決定します。
Loading Tab: For Flash 8 you can make simple parameter changes to the
loading text, loading bar, and loading image. You can also choose where
to anchor the loading text and bar.
「取込」 タブ:Flash8で利用するために、ローディング(読み込み)のテキスト、ローディングバー、ローディング画像の設定値を簡単に設定することが出来ます。またアンカーポイントの位置も決めることができます。
Output
出力
Format: Choose to output to either Flash 8 or Flash 9.
フォーマット:出力フォーマットを、Flash8かFlash9/10のどちらかを選んでください。
Output File: Change the name of the file (if you
wish) and choose where to save the outputted image. The default is to
output the file in the same directory as the original image. If no
change is made here, this is where you will find your outputted image.
出力ファイル:ファイル名の変更と出力保存先の変更が出来ます。デフォルトでは出力先は、オリジナルのパノラマ画像と同じフォルだに保存されます。もしここで何も変えなければ、出力画像と同じ場所に見つけることが出来るでしょう。
$n will be replaced with the projects name.
「$n」はプロジェクトファイルの名前に置き換わります。
Advanced Settings Tab
追加設定タブ
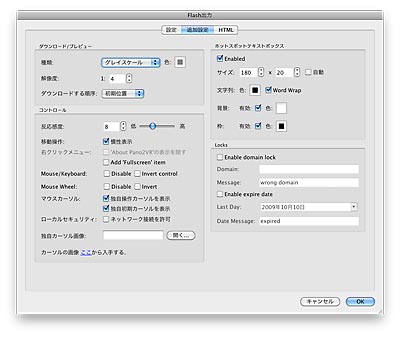
Under the Advanced Settings Tab you can define how the image will look during loading.
追加設定タブでは、読み込み中にどのように見せられるか、定義することができます。
Download/Preview
ダウンロード/プレビュー
Type: Choose from Grayscale, Color or Sepia while
downloading the panorama. For "none" you can choose a background color
for the download preview.
種類:パノラマのダウンロード時を、グレイスケール、カラー、セピアで選択します。「なし」を選択したら、ダウンロードプレビューの色は背景色として選択することが出来ます。
Resolution: This represents how clear or blurry the
downloading image will appear. This setting will effect the file size.
The default setting is 1:4 which is a reasonably good setting. Setting
it to 1:1, makes the downloading image as clear as the original image.
解像度:ここではダウンロード時の見た目がどれだけ鮮明か又はどれだけボケているかを規定します。この設定はファイルサイズに影響します。デフォルトは1:4という合理的な値です。設定を1:1にするとダウンロードデータは、元データと同じに鮮明です。
Download Order: In what order the image will download. Choose from:
ダウンロードする順序:ダウンロードする順序を決めます。選択肢は以下の通りです。
* None: No particular download order is assigned.
なし:特別な殊なしにダウンロードの順番が割り当てられます。
* Default View: This view is defined in Viewing Parameters.
初期位置:視野設定で決めた位置から始まります。
* Random: Parts of the image will download randomly.
ランダム:ダウンロードされる位置はランダムに表示されます。
Control
コントロール
Sensitivity: Set the movie's sensitivity to the
movement of the mouse. A low sensitivty will cause the panorama to move
slowly with the mouse's movement.
反応感度:マウス移動によるムービーの反応感度を設定します。低感度ではマウス操作に伴うパノラマの移動がより遅くなります。
Movement - Mass Simulation: How the panorama stops
after movement. When this is enabled, the panorama will slowly come to
a stop - as if it has mass. If not enabled, it will stop immediately.
移動操作 - 慣性表示:動作の後でパノラマがどのくらいで止まるか、を決めます。これが利用できる時、パノラマは慣性的にゆっくり停止するようになります。もし利用しなければ、直ちに停止することでしょう。
Disable Mouse/Keyboard: Disable/Enable interactivity with the movie via the mouse and keyboard.
マウス/キーボードの禁止:マウスやキーボードを使っての移動の双方向性を制御します。
Flash Context Menu: Show or Hide the About Pano2VR in the right-click context box.
右クリックメニュー:右クリックで表示されるコンテクストボックスの中の「About Pano2VR」を表示させる/隠す
Mouse Cursor: Show own movement cursor & Show
own default cursor: When both of these options are enabled, the mouse
pointer will turn into a bull's eye and directional arrows when the
panorama moves. When Show own default cursor is disabled, the system's
default cursor will replace the bull's eye.
マウスカーソル:独自操作カーソルを表示/独自初期カーソルを表示:両方のオプションに
チェックを入れていると、パノラマムービー内のマウスポインターが、ブルズアイとダイレクトアローに変わります。独自初期カーソルを利用不可の時は、ブル
ズアイがシステムでフォルトのカーソルに置き換わります。
Custom Cursor Image: Import your custom made cursor here. Check out information on cursors.
独自カーソル画像:自身で作成したカーソル画像を使用したい場合はここからインポートすることができます。カーソルの情報はこちらを参照のこと。
Local Security: When this is enabled, Flash will be
able to communicate with another website, but will deny Flash's access
to the local disk. When disabled, Flash can only access the local disk
and will not have access to a network.
ローカルセキュリティ:これが利用可になっていると、通常ローカルディスクからのFlashのアクセスが拒否される他の外部ウェブサイトとの通信が可能になります。チェックを外すと、Flashはローカル環境のみで動作し、外部ネットワークにアクセスできなくなります。
Hotspot Text Box
ホットスポットテキストボックス
Size: Set the size of the text for the hotspot. Auto: Choose this to have the text automatically fitted within the text box.
サイズ:ホットスポットのテキストサイズを設定します。自動:テキストボックスの中身を自動的にフィットさせたい時にはこれを選択してください。
Text: Choose the text color
文字列(テキスト):テキストの色を選択します。
Background: Choose Visible to show the background
of the text box and choose a color for the background. When Visible is
not checked, no background will be seen.
背景:テキストボックスの背景色を表示させるには、これにチェックを入れ、背景色を選択してください。もしチェックが入って無ければ、背景は表示されません。
Border: Choose Visible to show the border of the
text box and choose a color for the border. When Visible is not checked
no border will be seen.
枠:テキストボックスの枠を表示させるには、これにチェックを入れ、枠の色を選択してください。もしチェックが入って無ければ、枠は表示されません。
If you do not want to have the boxes visible at all - only the text
- be sure to uncheck Visible from both Background and Border.
もし全てのテキストボックスを表示させず、文字だけにしたいのなら、背景と枠の両方のチェックを外すことです。
Locks
ロック
Enable domain lock: Enable this option when you wish to secure your panorama only to the specified domains.
ドメインロックを有効にする:パノラマを特定のドメインにのみ有効にするためには、このオプションにチェックを入れてください。
Domain: Enter the domain to which the pano can only belong.
Separate multiple domains with a comma: www.gg-sw.com, www.nytimes.com.
ドメイン:パノラマが唯一属することが出来るドメインを入力してください。コンマで区切ることで複数のドメインを登録することができます。(例:www.gg-sw.com, www.nytimes.com)
Message: Insert a message that appears if the pano is displayed in a domain other than what is listed in Domain.
メッセージ:ドメインリストから外れたドメインで表示されたときに現れるメッセージを入力します。
Enable expire date: Here you can an expiration date of the visibility of the pano.
有効期限を有効にする:ここではパノラマを表示する期限日を決定することができます。
Last Day: Choose an end or expiration date.
最終日:期限最終日を決定します。
Date Message: Insert a message that will appear when a user tries to access the pano after the expiration date.
メッセージ:期限後にパノラマにアクセスしたユーザーに見せるメッセージを入力します。
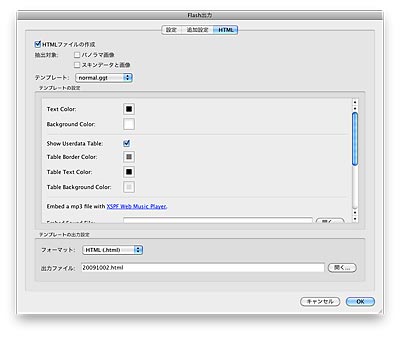
The HTML Tab
HTMLタブ
Use this tab to make a custumizable HTML page to add to your website that includes not only your panoramic movie but also audio.
ウェブサイトに追加するためにカスタマイズ化されたHTMLページを作るためには、このタブを開いて利用します。またこのページにはパノラマムービーだけでなく音を埋め込むこともできます。
Watch a tutorial on creating an HTML page.
HTMLページの生成方法はチュートリアルビデオをご覧下さい。
Information on the coding language used to create the HTML template can be found here.
HTMLテンプレートを構築するために使うコーディング言語の情報は、「HTML Template」ページを参照して下さい。
To be able to edit the HTML template parameters, you must select Enable Html File.
HTMLテンプレートが編集できるためには、有効なHTMLファイルを選択する必要が有ります。
Externalize: Depending on which you enable, this is will export
either the separate panorama images or the skin's data and imagaes.
This is helpful for those who want more control over your images and/or
the skin within a database.
抽出対象:ここでは必要であれば、分割したパノラマ画像やスキンデータ、画像データを出力することが可能です。これはデータベースによってスキンや画像をよりコントロールしやすくなります。
Template: Here you can choose a pre-loaded template
(fullscreen.ggt or normal.ggt). The normal template will give you the
ability to add table that shows the user data; whereas the fullscreen
template will not.
テンプレート:ココでは(fullscreen.ggtかnormal.ggtのどちらか)のテンプレートを事前に選択することができます。「normal」テンプレートでは作成者情報の表が追加されたページを利用でき、一方はフルスクリーンページが利用できます。
Template Parameters
テンプレートパラメーター
Text, Background Colors: Choose the color of your text and your page background.
文字色、背景色:文字の色とページ背景の色を決定します。
Show Userdata Table: Choose to show the userdata table or not.
作成者情報を表示する:作成者情報の表示の有無を選択します。
Table Border, Table Text, Table Background Colors: Use these color pickers to customize how your table.
表罫、表文字、表背景色:表の要素の色をカラーピッカーを利用して決めます。
Embed Sound File: Choose "Open" to locate and choose your MP3 of choice.
サウンドファイルの埋め込み:埋め込むMP3ファイルを選択して下さい。
Sound Title: The title of your audio (MP3) goes here.
サウンドタイトル:音声データ(MP3)のタイトルはここに書き込みます。
Panorama Video File: info coming soon
パノラマビデオファイル:(情報は近日公開)
Enable JavaScript Interface: info coming soon
JavaScriptインターフェイスの使用:(情報は近日公開)
Template Output
テンプレートの出力設定
Format: Choose between the extensions, .html and .htm.
フォーマット:拡張子を「.html」と「.htm」の2つから選択して下さい。
Output File: If you wish, change the name of the
file and choose where to save the outputted HTML file. The default is
to output the file in the same directory as the original image. If no
change is made here, this is where you will find your outputted image.
出力ファイル:もし望むなら、HTMLファイル名とHTMLファイルが保存されるフォルダの場所を変えることができます。
&n will be replaced with the name of your original image.
「&n」でオリジナルの画像ファイル名と置き換わります。
10月10日(土)15:00〜17:00にアップルストア心斎橋で開催する「QTVR Diary -OFFLINE- vol.12」に向けてお届けする、Pano2VRのオンラインヘルプ和訳。第13回は「Pano2VRの使い方:サムネイル及び投影変換したパノラマ画像の出力」です。
これで残るはあと2回。頑張りましょう!
Pano2VR - Output - Thumbnail
Pano2VR - 出力 - サムネイル
Outputting Thumbnails & Remapping Panoramic Images
サムネイル及び投影変換したパノラマ画像の出力
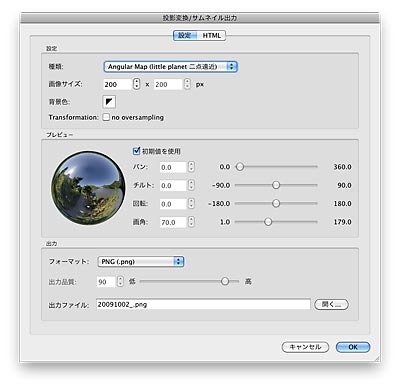
Pano2VR allows you to create a thumbnail image from your panoramic image and to remap your panoramic image.
Pano2VRはパノラマ画像からサムネイル画像を生成することが出来ます。さらにパノラマ画像の投影変換も行えます。
To do this, choose Transformation from the Output section and click
Add. This will open the parameters sheet for creating thumbnails and
remapping of images.
これを行うには、出力セクションで「投影変換」を選択し、「追加」をクリックして下さい。すると、サムネイル及び投影変換を行うための画面が開きます。
Settings Tab
設定タブ
Settings
設定
Type: Begin your thumbnail creation or image
remapping by first choosing which shape or type of image you want. Go
here to see what each type looks like.
種類:サムネールの作成または投影変換の作成にあたっては、最初に形状や種類を選択するところから始めて下さい。
Image Size: Define the size of your image expressed
in pixels. The first box is the length and depending on which type of
image you chose, the width will be automatically calculated for you.
画像サイズ:表示される画像のサイズをピクセル数で決めます。どちらかの入力欄に数値を入れると、もう一方の欄には自動的に数値が算出されます。
Background Color: Add a background color to the image.
背景色:画像の背景色を追加します。
Transformation: Check this option to avoid oversampling.
変換:オーバーサンプリングを避けるためにはここにチェックして下さい。
Preview
プレビュー
In the preview box, you can choose to use the default view set in
the viewing parameters section. Or, when this option is disabled, you
can create a different preview view by manipulating the various sliders
or manually entering in the values.
プレビュー欄では、視野設定セクションで設定したデフォルトの視野を選択することが出来ます。またはこのオプションにチェックを入れないと、スライダーバー入力や数値入力によって、違う見え方のプレビュー画像を作成することができます。
Output
出力
Format: Choose to output your image to PNG, JPG or TIFF.
フォーマット:PNG、JPG、TIFFから出力画像を選択して下さい。
Image Quality: When the output format is JPEG you can choose the quality of the outputted image. 90 is set as the default and can be changed.
出力品質:出力画像がJPEGの場合、出力品質を選択することが出来ます。デフォルトは「90」ですが、変えることが出来ます。
Output File: Choose the file name and destination of the outputted image.
出力ファイル:出力画像のファイル名と保存先を決めてください。
HTML Tab
HTMLタブ
Here you can create an HTML template.
ここではHTMLテンプレートを生成することができます。
There are two default templates to choose from:
2種類のテンプレートから選択して下さい。
* normal.ggt: customize the text and background colors and enable a user data table.
normal.ggt:テキストや背景の色、作成者情報の有無を設定できます。
* Spi-V.ggt: This one creates an HTML and XML file for the engine by fieldOfView.
Spi-V.ggt:これは「fieldOfView」を実行させるためのHTMLとXMLを生成します。
To use the Spi-V engine locally you must copy the files to a subdirectory called, dswmedia. Info
ローカル環境で「Spi-V」エンジンを利用するには、「dswmedia」と呼ばれるサブフォルダに保存しなければなりません。詳細はこちらを参照のこと。
10月10日(土)15:00〜17:00にアップルストア心斎橋で開催する「QTVR Diary -OFFLINE- vol.12」に向けてお届けする、Pano2VRのオンラインヘルプ和訳。第14回は「Pano2VRの使い方:ホットスポットの追加」です。
Pano2VR - Add Hotspots
Pano2VR - ホットスポットの追加
Using the Hotspot Editor
ホットスポットエディタを使って
Pano2VR lets you easily create and add hotspots to your panorama
movie. The hotspot editor is where you define the spot of interactivity
and then you can modify the hotspot's actions in the skin editor using
a hotspot template.
Pano2VRでパノラマムービーにホットスポットを加える作業は、とっても簡単です。
ホットスポットエディタは、インタラクティブな機能を持ったスポットを定義し、さらにスキンエディタ画面の中で、ホットスポットテンプレートを使ってほっ
とスポットのアクションを編集します。
After loading an image into Pano2VR or opening an existing project
you can get to the hotspot editor by choosing, Modify, from the
Hotspots area on the main page.
Pano2VRに画像を読み込んだ後、または既存のプロジェクトを開いた後で、メイン画面の「ホットスポット」エリアから、ホットスポットエディタを開くことが出来ます。
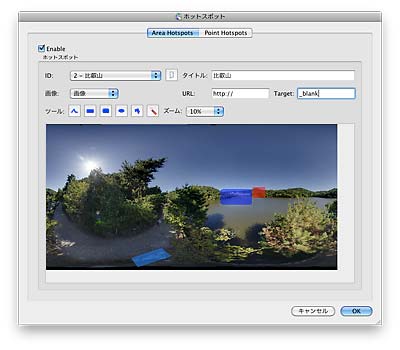
There are two tabs in the hotspot editor to create two different hotspots; Area Hotspots and Point Hotspots.
ホットスポットエディタが面には2種類の異なる機能のホットスポットを作成するために、2つのタブがあります。「エリアホットスポット」と「ポイントホットスポット」です。
Select the checkbox labeled Enable to enable hotspot editing.
ホットスポットの編集を行うには、「Enable(エリアホットスポットを使用する)」チェックボックスを選択して下さい。
Area Hotspots
エリアホットスポット(範囲指定ホットスポット)
The area hotspot defines an area of interaction.
エリアホットスポットは、アクションを興すことが可能なエリア(範囲)を定義します。
* ID: The hotspot's unique identification. Click this symbol to add a new hotspot.
ID:ホットスポットの独自IDを指します。新しいホットスポットを加えるには、右のアイコンボタンをクリックして下さい。
* Image:
画像
* Title: Add the title of the hotspot here. This title will be visible when the mouse pointer hovers over the hotspot.
タイトル:ホットスポットの題名はここに記述してください。この題名はホットスポットにマウスカーソルを合わせた時に、表示されるものです。
* Url: You can add a web URL or if you would like to open another
panorama, place the file name of the panorama here. When the user
clicks on the hotspot they will be directed to the site or image
specified.
URL:ウェブサイトURLを加えたり、別のパノラマを開くためにそのパノラマファイル名をここに記述します。ユーザーがそのホットスポットをクリックすると、サイトに移動したり、何らかのアクションが起こります。
* Target: Add a target to specify where to open the website.
ターゲット:ウェブサイトを開くときのターゲット指定を追加します。
HINT: You can also enter the Pan, Tilt, and Field of View
information in this field. This will override the default view settings
in viewing parameters. Enter the parameters separated by forward
slashes (/): 324.0/-3.5/70.0.
ヒント:この
入力欄を使ってパン(水平方向の移動)・チルト(垂直方向の移動)・FoV(視野角)を入力することも出来ます。これは「視野設定」
で設定したデフォルトの視野に上書きされます。値はスラッシュで区切って入力して下さい(例:324.0/-3.5/70.0)。
* Zoom: Zoom in to your image for easier placement of the hotspot.
ズーム:ホットスポットの設置をより簡単にするために、画像の縮尺を変えます。
* Tool: Use these tools to draw your hotspot area.
ツール:ホットスポットエリアを描くために、これらのツールを使います。
Pen ![]() ペン
ペン
Use this to manually draw your hotspot area.
ホットスポットエリアを手動で自由に描く際に使います。
Rectangle ![]() 矩形
矩形
Use this to draw a rectangular hotspot area.
矩形のホットスポットエリアを描く際に使います。
Rounded Rectangle ![]() 角丸
角丸
Draw a rectangle with rounded edges for the hotspot area.
角丸のホットスポットエリアを描く際に使います。
Ellipse ![]() 円形
円形
Use this tool to draw the hotspot as an ellipse.
円形のホットスポットを描く際に使います。
Polygon ![]() 多角形
多角形
Draw a polygon shape for the hotspot.
多角形のホットスポットを描く際に使います。
Erase ![]() 消去
消去
Use this tool to erase the hotspots. Then choose a shape tool to draw
over the hotspot to be erased. The hotspot shape will then turn blue
and the erasing shape will be red.
ホットスポットを消去する際に使います。形状ツールを選択した上で、消去ツールでホットスポットを上書きします。ホットスポットの描画時は青色ですが、消去時には赤になります。
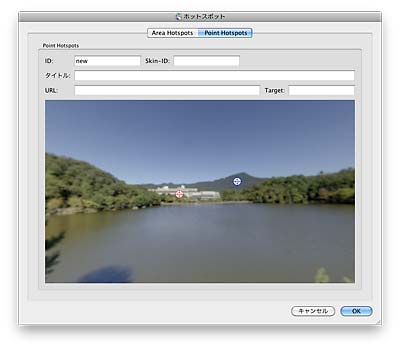
Point Hotspots
ポイントホットスポット(ポイント指定ホットスポット)
A point hotspot defines a point of interactivity within the
panorama. To add a point hotspot, double-click the point at which you
like to add the hotspot. This will enable the text fields in the upper
section.
ポイントホットスポットは、パノラマの中にインタラクティブな効果を与えるポイントを定義します。ポイントホットスポットを加えるには、指定したい位置をダブルクリックします。するとテキストフィールドがアクティブになり、テキスト情報が入力可能になります。
* ID: The hotspot's identification.
ID:ホットスポットの固有IDを定義します。
* Skin-ID: Use this ID to connect this hotspot to a hotspot
template. For example, if you have a hotspot template called, wiki, and
you would like a point hotspot to take that template's characteristics,
you would enter, wiki, in this field.
ス
キンID:ホットスポットテンプレートに、このホットスポットを接続させるためには、このIDを利用して下さい。例えば、「wiki」と呼ばれるホットス
ポットテンプレートがあり、テンプレートの特性をこのポイントホットスポットに与えたい場合は、このフィールドに「wiki」と入力してください。
* Title: Add the title of the hotspot here. This title will be visible when the mouse pointer hovers over the hotspot.
タイトル:ホットスポットの題名はここに記述してください。この題名はホットスポットにマウスカーソルを合わせた時に、表示されるものです。
* Url: You can add a web URL or if you would like to open another
panorama, place the file name of the panorama here. When the user
clicks on the hotspot they will be directed to the site or image
specified.
URL:ウェブサイトURLを加えたり、別のパノラマを開くためにそのパノラマファイル名をここに記述します。ユーザーがそのホットスポットをクリックすると、サイトに移動したり、何らかのアクションが起こります。
* Target: Add a target to specify where to open the website.
ターゲット:ウェブサイトを開くときのターゲット指定を追加します。
HINT: You can also enter the Pan, Tilt, and Field of View
information in this field. This will override the default view settings
in viewing parameters. Enter the parameters separated by forward
slashes (/): 324.0/-3.5/70.0.
ヒント:この
入力欄を使ってパン(水平方向の移動)・チルト(垂直方向の移動)・FoV(視野角)を入力することも出来ます。これは「視野設定」
で設定したデフォルトの視野に上書きされます。値はスラッシュで区切って入力して下さい(例:324.0/-3.5/70.0)。
How To
使い方
Create an area hotspot
エリアホットスポットの作成
1. Choose, Modify, from the Hotspots area on the main page.
A message asks if the hotspot file should be created. Click, Yes.
1.メインページの「ホットスポット」エリアから「変更」ボタンをクリックして下さい。
ホットスポットファイルが存在しないので、作成するかどうかを訊いてきますから、「はい」をクリックして下さい。

2. Now in the hotspot editor, select the Area Hotspots tab if it is not already selected.
2.新しいホットスポットエディタで、「Area Hotspots」タブを選択して下さい。既に選択されていれば、そのまま次に。
3. Select the checkbox labeled, Enable.
This will enable the text fields and allow you to draw a hotspot.
3.「Enable」にチェックを入れて下さい。これでテキストフィールドに入力が出来たり、ホットスポットの描画が出来ます。
4. Zoom in to the image if you wish to get better detail for drawing your hotspot. Use the menu to choose how far to zoom in.
4.ホットスポットを描画しやすいように、適当な大きさまで拡大ズームして下さい。ズームの縮尺はメニューで確認できます。
5. Choose a shape from the tool section and drag over the area to be interactive.
The area hotspot that you created will be red.
5.ツール一覧から形状を選択し、画面上にドラッグしながら描画して下さい。
6. Enter the hotspot's title in the Title field.
The title will be seen when the mouse hovers over the hotspot.
6.「タイトル」にホットスポットの題名を入力して下さい。
題名は、ホットスポットにマウスカーソルを合わせた時に、表示されます。
7. Insert a web link in the URL field to send the user to your destination of choice.
You can also link to another panorama by entering its file name here.
Note: The file must be located in the same directory as the starting panorama.
7.「URL」にウェブサイトへのURLアドレスを入力してください。
別のパノラマのファイル名を入力することによって、リンクさせることもできます。
注:リンクするパノラマファイルは、最初に読み込まれるパノラマと同じフォルダに存在しなければなりません。
8. If you wish, add a target.
A target can direct the website
to open in the same browser window, in a new browser window, etc. It
can also specify the angle of view of the next panorama. However, if
you're unfamiliar with targets, you can leave this blank.
8.もし希望するなら、ターゲットを加えます。
ターゲットは、移動するウェブサイトを同じブラウザ画面で直接開くか、新しいブラウザ画面で移動するか、など様々な方法があります。また次のパノラマに
移るときの視野角を指定することも出来ます。しかしながら、ターゲット指定に詳しくないなら、ここは空白で構いません。
9. Click OK.
9.「OK」をクリックします。
Add more than one area hotspot
複数のエリアホットスポットを追加する
1. In the hotspot editor, click this icon ![]() to add another hotspot.
to add another hotspot.
The current or selected hotspot will always be red while other hotspots
on the same image will be shaded different colors. The colors will not
be seen on output. They are for identification purposes only.
The new hotspot will be numbered sequentially:
1.ホットスポットエディタで、他のホットスポットを追加するには、をクリックしてください。
現在、または選択されているホットスポットは常に赤色で示され、同じ画像内の別のホットスポットは違う色で示されます。その色は出力には反映されません。判別の目的のみに使用されます。
新しいホットスポットは順番に番号が付けられます。

2. Follow steps 4 through 9 in the previous section.
You can choose and edit a hotspot further by selecting it from the ID menu.
2.以降は上記の4から9の工程と同様です。
さらに、IDメニューから選択してホットスポットを選択及び編集することができます。
Create a point hotspot
ポイントホットスポットの作成
1. Choose, Modify, from the Hotspots area on the main page.
A message asks if the hotspot file should be created. Click, Yes.
1.メインページの「ホットスポット」エリアから「変更」ボタンをクリックして下さい。
ホットスポットファイルが存在しないので、作成するかどうかを訊いてきますから、「はい」をクリックして下さい。
2. Now in the hotspot editor, select the Point Hotspots tab if it is not already selected.
2.新しいホットスポットエディタで、「Area Hotspots」タブを選択して下さい。既に選択されていれば、そのまま次に。
3. Select the checkbox labeled, Enable.
This will enable the text fields and allow you to create a hotspot.
3.「Enable」にチェックを入れて下さい。これでテキストフィールドに入力が出来たり、ホットスポットの作成が出来ます。
4. Double-click on a point in the image to create a hotspot.
A red bullseye ![]() will represent this point.
will represent this point.
4.画像内のポイントへダブルクリックして、ホットスポットを作成してください。
赤いブルズアイ(同心円)の画像がこのポイントを指します。
5. Enter the hotspot's title in the Title field.
The title will be seen when the mouse hovers over the hotspot.
5.「タイトル」にホットスポットの題名を入力して下さい。
題名は、ホットスポットにマウスカーソルを合わせた時に、表示されます。
6. Insert a web link in the URL field to send the user to your destination of choice.
You can also link to another panorama by entering its file name here.
Note: The file must be located in the same directory as the starting panorama.
6.「URL」にウェブサイトへのURLアドレスを入力してください。
別のパノラマのファイル名を入力することによって、リンクさせることもできます。
注:リンクするパノラマファイルは、最初に読み込まれるパノラマと同じフォルダに存在しなければなりません。
7. If you wish, add a target.
A target can direct the website
to open in the same browser window, in a new browser window, etc. It
can also specify the angle of view of the next panorama. However, if
you're unfamiliar with targets, you can leave this blank.
7.もし希望するなら、ターゲットを加えます。
ターゲットは、移動するウェブサイトを同じブラウザ画面で直接開くか、新しいブラウザ画面で移動するか、など様々な方法があります。また次のパノラマに
移るときの視野角を指定することも出来ます。しかしながら、ターゲット指定に詳しくないなら、ここは空白で構いません。
8. Click OK.
8.「OK」をクリックします。
Add more than one point hotspot
複数のホットスポットの追加
1. Double-click anywhere on the image in the editor to add a new point hotspot.
The active point hotspot will be red.
1.新しいポイントホットスポットを追加するには、エディタの画像の中のどこにでもダブルクリックして下さい。

2. Follow steps 5 through 8 in the previous section.
2.以降は上記の5から8のステップと同様です。
Hotspot Tutorials
ホットスポットのビデオチュートリアル
A video tutorial on creating hotspots in v.2.2.2 can be found on the Tutorial page. It is a series with six parts.
Pano2VR ver2.2.2でのホットスポット作成のビデオチュートリアルは、「チュートリアル」ページよりご覧いただけます。ぜんぶで6回シリーズです。
There is also a written tutorial that you can use to follow along with the video tutorials or simply use it by itself.
またホットスポット作成のチュートリアルに関しては「ウェブページチュートリアル」もあり、こちらはビデオの内容と同じことを、分かりやすく書いています。
For both, there are project files for you to use. For each part,
there is a folder in which everything you need to recreate the tutorial
is found. The projects are packed in a ZIP (22MB).
両方に関して、ユーザーが使えるプロジェクトファイルを用意してあります。各パート毎に、チュートリアルを繰り返し学べるようにフォルダに分けてあります。そのプロジェクトはZIP圧縮したデータです(22MB)。
2009年10月10日(土)15:00〜17:00 参加無料・予約不要・入退場自由のイベントです。お気軽にお越し下さい!懇親会(参加費6,000円)の参加申込もエントリー記事のコメント欄に表明して下さい!

